Hey all,
++++++++++++++++++
++++++++++++++++++
Update, jump straight to the final module & results:
viewtopic.php?f=9&t=26560&start=25#p239784
++++++++++++++++++
++++++++++++++++++
I've been looking at my PST again and thinking of doing two things. One, just keep the etalon and adapters and use it as a stage 2 PST mod and double-stack option with other etalons as I currently have it. Two, I'm considering keeping it intact but I want to replace the black box. I really dislike the black box and the prism and all that. It's too much to fiddle with and keep aligned right and proper. I'd rather get rid of the black box completely and instead put a different kind of focuser and do a straight-through design using the existing blocking filter. I have an adapter on the way to step the threading of the eyepiece holder of the PST to a standard threading that can work with other eyepiece stuff and 1.25" gear. My main goal is to get rid of the sloppy focuser and prism. I've seen people do this with an SCT focuser and an adapter of some sort. I'm also considering doing it with a good helical focuser if it can be simpler to adapt (again the goal is straight through, no diagonals, even the blocking filter will be straight through).
Granted, I can already do this. I have my adapters and can insert my PST etalon into another scope's existing focuser with 8" of extension with the collimating lens in an F10 scope (such as ST80 stopped down to 40mm) so that I don't have to cut a tube and simply insert that 8" extension with colimating lens into the scope's focuser and be set. Then I have a good focuser and I can adapt the blocking filter no problem with the step down threading in a straight through design. But, this makes it impossible to double-stack the system with a SM40II module at any point since without a costly adapter that wouldn't work on "all" scopes either, which I want to avoid (being stuck with one possible way to use it, I like things modular). That is, of course, unless two PST etalons can be double stacked successfully. But that seems harder to do without tilt mechanisms. So I probably will not pursue double-stacking it again unless I keep the gold tube and stock lens for that purpose. I've double stacked it in the past with a SM40II and liked it visually but imaging wise I had issues with it at the time.
So again I'm looking at two potential projects and directions.
A) 8" of 2" extensions with collimating lenses with PST adapters so that it can be inserted into any scope without cutting the scope, and simply adapt my blocking filter in a straight through with the step down threading I have coming, making it a hybrid PST stage 1 mod. No more black box at all. But uses the stock blocking filter. This is the cheapest thing I can do with it right now. ERF will be a Baader Red CCD imaging filter (2").
B) Or, find a way to replace the black box with a different kind of focuser, keep the golden rod and stock lens and straight through adapt the blocking filter. The question becoming, what to use for the focuser.... SCT crayford adapted or maybe a helical (a good one though), whatever is easier to adapt. I would love to avoid more custom adapters since I already have the PST adapters for front/rear that convert the etalon to work with any 2" typical gear if that helps.
Thoughts?
Very best,
Easy PST Module with ERF (non-destructive, no cutting of OTA, & no-black-box rebuild)
-
MalVeauX

- Way More Fun to Share It!!

- Posts: 1861
- Joined: Tue May 09, 2017 7:58 pm
- Location: Florida
- Has thanked: 1188 times
- Been thanked: 1382 times
Easy PST Module with ERF (non-destructive, no cutting of OTA, & no-black-box rebuild)
Last edited by MalVeauX on Wed Sep 18, 2019 2:35 pm, edited 3 times in total.
-
MalVeauX
- Way More Fun to Share It!!
- Posts: 1861
- Joined: Tue May 09, 2017 7:58 pm
- Location: Florida
- Has thanked: 1188 times
- Been thanked: 1382 times
Re: PST, how to replace that black box?
While figuring ideas... I have a M36 to 2" adapter coming to convert a helical focuser to be able to simply insert into standard 2" gear. I will try to do a straight through design and the adapter blocking filter will simply insert into the helical focuser and I'll just measure out the needed spacing from the rear collimating lens to where focus would be achieved without a diagonal/prism and go from there. This would allow typical use and still allow double stacking with the SM40II.
And of course, I will do the obligatory Quark test with it. I have double stacked my Quark with the PST etalon (without its collimating lenses) with ok results, but not great results. Once I have the focuser, I will see what it's like if I put the Quark inline with 2" gear, operating at F42, without the PST blocking filter, with the Quark in 2" extensions behind the PST etalon and the helical focuser on the camera side after the Quark. This may not work. I'm not sure. I will use a 0.5x focal reducer after the Quark (F21). If it does work, I will post results.
Very best,
-
Merlin66

- Librarian
- Posts: 3972
- Joined: Tue Dec 13, 2011 1:23 pm
- Location: Junortoun, Australia
- Has thanked: 174 times
- Been thanked: 619 times
- Contact:
Re: PST, how to replace that black box?
The removal of the PST black box - is a Stage 0.5 mod.
The back focus from the rear lens of the PST etalon assembly is 200mm.
You 're looking at a Stage 2 rear end. I have a M50 to T thread adaptor some T thread spacers then a Borg Helical focuser. I use a BF10, but you can use the original PST blocker in a suitable adaptor.
The back focus from the rear lens of the PST etalon assembly is 200mm.
You 're looking at a Stage 2 rear end. I have a M50 to T thread adaptor some T thread spacers then a Borg Helical focuser. I use a BF10, but you can use the original PST blocker in a suitable adaptor.
"Astronomical Spectroscopy - The Final Frontier" - to boldly go where few amateurs have gone before
https://groups.io/g/astronomicalspectroscopy
http://astronomicalspectroscopy.com
"Astronomical Spectroscopy for Amateurs" and
"Imaging Sunlight - using a digital spectroheliograph" - Springer
https://groups.io/g/astronomicalspectroscopy
http://astronomicalspectroscopy.com
"Astronomical Spectroscopy for Amateurs" and
"Imaging Sunlight - using a digital spectroheliograph" - Springer
-
MalVeauX
- Way More Fun to Share It!!
- Posts: 1861
- Joined: Tue May 09, 2017 7:58 pm
- Location: Florida
- Has thanked: 1188 times
- Been thanked: 1382 times
Re: PST, how to replace that black box?
Interesting thanks! I'll measure things and see what all options happen at 200mm.
Very best,
Very best,
-
MalVeauX
- Way More Fun to Share It!!
- Posts: 1861
- Joined: Tue May 09, 2017 7:58 pm
- Location: Florida
- Has thanked: 1188 times
- Been thanked: 1382 times
Re: PST, how to replace that black box?
Super cute! That hardware looks familiar! Great way to start!
My understanding is that the piece that secures with the front collimating lens can thread into a 2" M48 extension, so 8" of those should put it into position without having to cut a tube. Right?
Very best,
My understanding is that the piece that secures with the front collimating lens can thread into a 2" M48 extension, so 8" of those should put it into position without having to cut a tube. Right?
Very best,
-
Merlin66
- Librarian
- Posts: 3972
- Joined: Tue Dec 13, 2011 1:23 pm
- Location: Junortoun, Australia
- Has thanked: 174 times
- Been thanked: 619 times
- Contact:
Re: PST, how to replace that black box?
BP,
The closer you achieve the majic -200mm the better the performance. Don’t compromise.
The closer you achieve the majic -200mm the better the performance. Don’t compromise.
"Astronomical Spectroscopy - The Final Frontier" - to boldly go where few amateurs have gone before
https://groups.io/g/astronomicalspectroscopy
http://astronomicalspectroscopy.com
"Astronomical Spectroscopy for Amateurs" and
"Imaging Sunlight - using a digital spectroheliograph" - Springer
https://groups.io/g/astronomicalspectroscopy
http://astronomicalspectroscopy.com
"Astronomical Spectroscopy for Amateurs" and
"Imaging Sunlight - using a digital spectroheliograph" - Springer
-
MalVeauX
- Way More Fun to Share It!!
- Posts: 1861
- Joined: Tue May 09, 2017 7:58 pm
- Location: Florida
- Has thanked: 1188 times
- Been thanked: 1382 times
Re: PST, how to replace that black box?
I just tested it and the inside of the PST etalon housing that faces the incoming light beam threads out with the collimating lens still threaded into its center. That threading is the same as 2" standard filter threads (M48 I think?). So 2" eyepiece extensions have this threading and 8" (200mm) of that can be threaded into place and then the plate with the collimating lens can thread down into the barrel. If I extend the extensions a little bit more, I can thread a 2" ERF (Baader Red CCD filter) in front of that so it's ready to go in any refractor upwards of 150mm or so and deep into the light cone. The F10 beam will be the same from the collimating lens whether its up close or 8 inches away I think? This simply inserts into the focuser and stops at the etalon itself. Post etalon will be the PST adapter with 2" entry. I need 200mm (8") out focus from it, at this point I can slide in a Quark with 2" skirt and go from there. Or, leave out that, and just have 2" extensions that end in 1.25" with a helical focuser and the stock PST blocking filter adapted to straight through on the helical focuser and it can be used as a standalone straight through instrument by putting the golden tube back on with its lens, or it can be inserted into another OTA without the golden rod. Two potential ways to use it. I'll try it all out. Some of it might work. Might not. I have two PST etalons to fiddle with, one good working one, and one bad one (decontacted I think?).
Any of that make sense or anything off?
Very best,
Any of that make sense or anything off?
Very best,
-
bart1805
- Almost There...

- Posts: 636
- Joined: Mon Feb 06, 2017 9:04 pm
- Location: The Netherlands
- Been thanked: 1 time
Re: PST, how to replace that black box?
Don't understand completely what you are saying. In a f/10 telescope the front lens should be placed at minus 200mm from the focal point. It is true that you can mount the etalon (without the front lens) further back. The distance from the backlens of the etalon to the focal point is about 200mm.
-
MalVeauX
- Way More Fun to Share It!!
- Posts: 1861
- Joined: Tue May 09, 2017 7:58 pm
- Location: Florida
- Has thanked: 1188 times
- Been thanked: 1382 times
Re: PST, how to replace that black box?
Trying to make it so that I don't have to cut any refractor tubes. So my understanding is that I can extend the collimating lens in front of the etalon by extending it out 200mm since all the threading is M48 and 2" this is common stuff and doesn't need custom work. Then at the back end its business as usual as a stage 2 but with the stock blocking filter instead of buying a new expensive one.bart1805 wrote: ↑Sat Sep 07, 2019 2:06 pm Don't understand completely what you are saying. In a f/10 telescope the front lens should be placed at minus 200mm from the focal point. It is true that you can mount the etalon (without the front lens) further back. The distance from the backlens of the etalon to the focal point is about 200mm.
Very best,
-
bart1805
- Almost There...
- Posts: 636
- Joined: Mon Feb 06, 2017 9:04 pm
- Location: The Netherlands
- Been thanked: 1 time
Re: PST, how to replace that black box?
Ehm. The threading of the etalon is not m48. The front part of the front AOK adapter is M48. You could indeed try to install the front lens of the etalon in the nosepiece of the AOK adapter. If the telescope you are talking about has not enough back focus.
-
MalVeauX
- Way More Fun to Share It!!
- Posts: 1861
- Joined: Tue May 09, 2017 7:58 pm
- Location: Florida
- Has thanked: 1188 times
- Been thanked: 1382 times
Re: PST, how to replace that black box?
Maybe I have it wrong. The internal disc that threads into the PST housing with the first collimating lens threaded into its center, it comes out, and literally threads into the end of any typical 2" accessory I have just like a standard 2" filter does. That's not M48? I might just have that wrong. Either way, it threads into typical 2" stuff so I can extend it out using standard 2" extensions. I just hope that putting it 200mm forward with extensions allows it to still work appropriately to be able to use it without having to cut tubes.
Very best,
-
bart1805
- Almost There...
- Posts: 636
- Joined: Mon Feb 06, 2017 9:04 pm
- Location: The Netherlands
- Been thanked: 1 time
Re: PST, how to replace that black box?
Hi Marty, can you post a picture what you mean with "internal disc". Thanks!
-
MalVeauX
- Way More Fun to Share It!!
- Posts: 1861
- Joined: Tue May 09, 2017 7:58 pm
- Location: Florida
- Has thanked: 1188 times
- Been thanked: 1382 times
Re: PST, how to replace that black box?
Yep, thanks!
Here's the internal disc that threads out from the lower internal threads, this threading happens to also thread into any 2" threading like a standard 2" filter does. This is not the same threading as the upper threading which is unique to the PST housing where it connects to the gold tube. Moving this disc forward can be done with 2" extensions.
- pst_01.jpg (57.56 KiB) Viewed 13464 times
Here's the disc threading into a 2" extension tube, not planning to use this, just to show it threads onto typical 2" stuff.
- pst_02.jpg (43.1 KiB) Viewed 13464 times
I have these 2" spacer rings, that are 2" threaded. I can combine a few to make the total 200mm needed with the collimating lens threaded at the end.
I just connected 2" threads on both sides and the disc and collimating lens are sitting inside a 2" housing threaded together. So I can put another short extension at the end and place a 2" ERF (Baader Red CCD ir block filter).
https://agenaastro.com/blue-fireball-2- ... nsion.html
Very best,
-
MalVeauX
- Way More Fun to Share It!!
- Posts: 1861
- Joined: Tue May 09, 2017 7:58 pm
- Location: Florida
- Has thanked: 1188 times
- Been thanked: 1382 times
Re: PST, how to replace that black box?
Hrm,
Here's a couple of those eyepiece extenstions (2") thread into the PST front adapter and the collimating lenses's plate and the colliamting lens threaded into the end. This is only 6 inches long, so I need another 2 inches to make it 8 inches total.
I'm not entirely sure where to measure from to start the 8" (200mm) point. Is it at the original point where the collimating lens was and then go 200mm out?
Also, how to figure in the focuser in this, if applicable in terms of the distance too?
The PST adapter (AOK) nose is about 1.5" long from where the lens would normally sit behind it. So 4x 1.5" spacers would add 6" to this for 7.5" and then I have a 0.5" extension to finish it off. Thread on the plate/collimating lens. Then a gender reversale. And one more 0.5" extension and then thread on a 2" ERF filter to complete the module for small refractor use. Behind the PST housing, the AOK 2" adapter with 2" extensions as long as it takes (8") to terminate to a typical 2" to 1.25" adapter for the helical focuser and then the blocking filter and all that as a straight through. I will also see how much distance a 1.25" diagonal adds, as the eyepiece holder threads directly into a standard old celestron 1.25" star diagonal which could be used for visual purposes. Just waiting on the helical focuser and M36 -> 2" adapter to arrive.
Forgive my obvious ignorance on this, I just haven't found much chatter/documentation on doing it this way versus cutting tubes or using SCT scopes for this purpose.
The idea is to simply insert this into a focuser and it's 8" forward, rather than cutting a tube.
Think this would work?
Very best,
Here's a couple of those eyepiece extenstions (2") thread into the PST front adapter and the collimating lenses's plate and the colliamting lens threaded into the end. This is only 6 inches long, so I need another 2 inches to make it 8 inches total.
I'm not entirely sure where to measure from to start the 8" (200mm) point. Is it at the original point where the collimating lens was and then go 200mm out?
Also, how to figure in the focuser in this, if applicable in terms of the distance too?
The PST adapter (AOK) nose is about 1.5" long from where the lens would normally sit behind it. So 4x 1.5" spacers would add 6" to this for 7.5" and then I have a 0.5" extension to finish it off. Thread on the plate/collimating lens. Then a gender reversale. And one more 0.5" extension and then thread on a 2" ERF filter to complete the module for small refractor use. Behind the PST housing, the AOK 2" adapter with 2" extensions as long as it takes (8") to terminate to a typical 2" to 1.25" adapter for the helical focuser and then the blocking filter and all that as a straight through. I will also see how much distance a 1.25" diagonal adds, as the eyepiece holder threads directly into a standard old celestron 1.25" star diagonal which could be used for visual purposes. Just waiting on the helical focuser and M36 -> 2" adapter to arrive.
Forgive my obvious ignorance on this, I just haven't found much chatter/documentation on doing it this way versus cutting tubes or using SCT scopes for this purpose.
The idea is to simply insert this into a focuser and it's 8" forward, rather than cutting a tube.
Think this would work?
- pst_03.jpg (41.81 KiB) Viewed 13461 times
Last edited by MalVeauX on Sat Sep 07, 2019 5:15 pm, edited 1 time in total.
-
bart1805
- Almost There...
- Posts: 636
- Joined: Mon Feb 06, 2017 9:04 pm
- Location: The Netherlands
- Been thanked: 1 time
Re: PST, how to replace that black box?
Aha, you have taken the whole piece out, not just the front lens. It goes like this:
Define the original focal point of the f/10 telescope. 200 mm before that point there has to be the front lens of the etalon. Sometimes it means cutting the telescope 4 to 6 cm, because the backfocus is somewhere between 14 to 16 cm. Let's assume it is 16 cm. Instead of cutting the telescope, you can also move just the front lens 4 cm into the telescope. Etalon is placed at minus 16, but that does not matter. There is no need to put the front lens 200mm before the etalon because that would mean your telescope has no backfocus at all. If that is the case: send it back. (-;
Define the original focal point of the f/10 telescope. 200 mm before that point there has to be the front lens of the etalon. Sometimes it means cutting the telescope 4 to 6 cm, because the backfocus is somewhere between 14 to 16 cm. Let's assume it is 16 cm. Instead of cutting the telescope, you can also move just the front lens 4 cm into the telescope. Etalon is placed at minus 16, but that does not matter. There is no need to put the front lens 200mm before the etalon because that would mean your telescope has no backfocus at all. If that is the case: send it back. (-;
-
MalVeauX
- Way More Fun to Share It!!
- Posts: 1861
- Joined: Tue May 09, 2017 7:58 pm
- Location: Florida
- Has thanked: 1188 times
- Been thanked: 1382 times
Re: PST, how to replace that black box?
Thanks, starting to clear up!bart1805 wrote: ↑Sat Sep 07, 2019 5:11 pm Aha, you have taken the whole piece out, not just the front lens. It goes like this:
Define the original focal point of the f/10 telescope. 200 mm before that point there has to be the front lens of the etalon. Sometimes it means cutting the telescope 4 to 6 cm, because the backfocus is somewhere between 14 to 16 cm. Let's assume it is 16 cm. Instead of cutting the telescope, you can also move just the front lens 4 cm into the telescope. Etalon is placed at minus 16, but that does not matter. There is no need to put the front lens 200mm before the etalon because that would mean your telescope has no backfocus at all. If that is the case: send it back. (-;
So the front collimating lens needs to be 200mm forward from where ever the focus point is behind the focuser. So for that, I can just point it at the sun and move an object that won't melt back and forth until it's focused. Then from that point, measure 200mm forward into the system with the focuser and all that in place and then look at where the etalon would be sitting in this train. That distance difference is how long the extensions need to be then.
Sound right?
Thanks!
++++++++++++++++++++++
So here's a not so elegant approach. I just quickly pointed a scope that I'd use towards the sun and took everything off and wracked focus tube in as much as it will go. I measured from the closest point of the focuser where something could be, to the focus point behind it. It seemed to be about 5" (120~127mm) from the focus tube to that point. This is a ST120 with a GSO 2" Linear bearing focuser, pretty short. So, knowing my focus point is 120~127mm behind that focuser how does that play into this exactly? Does that mean I only have to add extensions that reach another 75~80mm into the OTA to hit the 200mm mark?
I tested two scopes, both were around 5" and 5.5" behind the focuser achieving focus.
- focus_point.jpg (105.78 KiB) Viewed 13451 times
-
MalVeauX
- Way More Fun to Share It!!
- Posts: 1861
- Joined: Tue May 09, 2017 7:58 pm
- Location: Florida
- Has thanked: 1188 times
- Been thanked: 1382 times
Re: PST, how to replace that black box?
Interesting, thanks!
So, if my focus point behind my focuser is 120mm, I need the front collimating lens to be 80mm inside the focuser tube. Now, (A) does my etalon have to be sitting at the focus point and extensions go from there? Or (B) do I place the etalon assembly into the focuser as far as in as it all goes, then put enough extensions to push the collimating lens 80mm deeper into the focuser tube?
Thanks!
Very best,
-
bart1805
- Almost There...
- Posts: 636
- Joined: Mon Feb 06, 2017 9:04 pm
- Location: The Netherlands
- Been thanked: 1 time
Re: PST, how to replace that black box?
The front lens has to be minus 200mm, not the etalon. So in this case you position the etalon with the foucusser fully racked in. 80mm extensions before the etalon. With the front lens mounted right there.
About 200mm after the etalon will be the new focus point.
About 200mm after the etalon will be the new focus point.
-
MalVeauX
- Way More Fun to Share It!!
- Posts: 1861
- Joined: Tue May 09, 2017 7:58 pm
- Location: Florida
- Has thanked: 1188 times
- Been thanked: 1382 times
Re: PST, how to replace that black box?
Thanks!bart1805 wrote: ↑Sat Sep 07, 2019 6:34 pm The front lens has to be minus 200mm, not the etalon. So in this case you position the etalon with the foucusser fully racked in. 80mm extensions before the etalon. With the front lens mounted right there.
About 200mm after the etalon will be the new focus point.
I think I got it then. I'll try to do a more precise measurement of the focus point on the scopes I'll test to get it closer and more accurate. Extensions to bring the front collimating lens -200mm into the OTA from that focus point, unique to each imaging train and I'll just keep some documentation on the scopes so I know what extension mount is needed. Post etalon, I will do +200mm extension, minus a bit to allow for 2" to 1.25" conversion and bits and pieces for visual/imaging.
I'm curious if it's possible to slide my Quark into the post-etalon 2" extensions....
Very best,
-
Merlin66
- Librarian
- Posts: 3972
- Joined: Tue Dec 13, 2011 1:23 pm
- Location: Junortoun, Australia
- Has thanked: 174 times
- Been thanked: 619 times
- Contact:
Re: PST, how to replace that black box?
Marty,
Just check the baffles and their position inside the OTA....
I had an issue mounting a 150mm long 2" CaK module I constructed into the refractor due the the rear baffle.....
Just check the baffles and their position inside the OTA....
I had an issue mounting a 150mm long 2" CaK module I constructed into the refractor due the the rear baffle.....
"Astronomical Spectroscopy - The Final Frontier" - to boldly go where few amateurs have gone before
https://groups.io/g/astronomicalspectroscopy
http://astronomicalspectroscopy.com
"Astronomical Spectroscopy for Amateurs" and
"Imaging Sunlight - using a digital spectroheliograph" - Springer
https://groups.io/g/astronomicalspectroscopy
http://astronomicalspectroscopy.com
"Astronomical Spectroscopy for Amateurs" and
"Imaging Sunlight - using a digital spectroheliograph" - Springer
-
MalVeauX
- Way More Fun to Share It!!
- Posts: 1861
- Joined: Tue May 09, 2017 7:58 pm
- Location: Florida
- Has thanked: 1188 times
- Been thanked: 1382 times
Re: PST, how to replace that black box?
Good point, will check it out to make sure there's not something stopping it!
Very best,
-
marktownley

- Librarian
- Posts: 42545
- Joined: Tue Oct 18, 2011 5:27 pm
- Location: Brierley Hills, UK
- Has thanked: 20813 times
- Been thanked: 10485 times
- Contact:
Re: PST, how to replace that black box?
No reason why it won't work Marty, i've done this.

http://brierleyhillsolar.blogspot.co.uk/
Solar images, a collection of all the most up to date live solar data on the web, imaging & processing tutorials - please take a look!
-
MalVeauX
- Way More Fun to Share It!!
- Posts: 1861
- Joined: Tue May 09, 2017 7:58 pm
- Location: Florida
- Has thanked: 1188 times
- Been thanked: 1382 times
Re: PST, how to replace that black box?
I believe I used your disassembly/reassembly of a PST etalon housing that I used as reference to NOT cut an OTA and just explore extensions!
Very best,
-
MalVeauX
- Way More Fun to Share It!!
- Posts: 1861
- Joined: Tue May 09, 2017 7:58 pm
- Location: Florida
- Has thanked: 1188 times
- Been thanked: 1382 times
Re: PST, how to replace that black box?
While on the subject of the PST in general, I have two elements. An old one that is reddish colored, where I think it was coated to be the ITF itself. And I have a newer element, that is a blue color, where an actual ITF filter was later installed before the eyepiece holder and blocking filter.
Very best,
Very best,
Last edited by MalVeauX on Tue Sep 10, 2019 12:46 am, edited 2 times in total.
-
MalVeauX
- Way More Fun to Share It!!
- Posts: 1861
- Joined: Tue May 09, 2017 7:58 pm
- Location: Florida
- Has thanked: 1188 times
- Been thanked: 1382 times
Re: PST, how to replace that black box?
The 2" -> M36 adapter came in today, so the helical focuser can now sit in a 2" extension. Everything works and focused up nice.
Success!
Very best,
Success!
- PST_NoBlackBox_01_09092019.jpg (133.89 KiB) Viewed 12048 times
- PST_NoBlackBox_02_09092019.jpg (70.09 KiB) Viewed 12048 times
- PST_NoBlackBox_03_09092019.jpg (209.12 KiB) Viewed 12048 times
- PSTNoBlackBox_SetupSolar_09092019.jpg (109.06 KiB) Viewed 12048 times
-
MalVeauX
- Way More Fun to Share It!!
- Posts: 1861
- Joined: Tue May 09, 2017 7:58 pm
- Location: Florida
- Has thanked: 1188 times
- Been thanked: 1382 times
Re: PST, how to replace that black box?
From right to left:
PST Etalon ->AOK Swiss rear PST adapter (2" barrel) -> 50mm 2" Extension -> M36 -> 2" Adapter threaded to a M36 threaded helical focuser -> 1.25" eyepiece nose with ITF threaded inside it -> M33 to M28 adapter -> PST eyepiece holder with 5mm blocking filter inside ->
Those items happened to hit the magical 8" roughly. The helical focuser does the rest.
The camera focuses as you see here.
To use it visually, I add a 2nd 1.25" eyepiece nose to the eyepiece inserted to give it another few mm to achieve focus.
Since I can control in focus range, I can probably get this to work with binoviewers (though is probably too much for that helical focuser). Also, no special low profile adapters or anything needed for the cameras. Seen here is an ASI290MM with its standard 1.25" nose. Since we can control the focus ranges, we can probably get any camera to come to focus, even a dSLR (not doing that thought!).
So, the option where I just have the PST with no black box and potentially still double stack it, works. So that's good. I can at least do this and put a SM40II on it without the internal prism and janky focuser. The helical is plenty precise for this imaging train and course image scale.
The next thing is to diassemble and extend the collimating lens out for use in another scope as a PST Mod.
I will also test it in my SCT with its D-ERF just to show a Stage II PST mod on the SCT that is straight through.
Very best,
PST Etalon ->AOK Swiss rear PST adapter (2" barrel) -> 50mm 2" Extension -> M36 -> 2" Adapter threaded to a M36 threaded helical focuser -> 1.25" eyepiece nose with ITF threaded inside it -> M33 to M28 adapter -> PST eyepiece holder with 5mm blocking filter inside ->
Those items happened to hit the magical 8" roughly. The helical focuser does the rest.
The camera focuses as you see here.
To use it visually, I add a 2nd 1.25" eyepiece nose to the eyepiece inserted to give it another few mm to achieve focus.
Since I can control in focus range, I can probably get this to work with binoviewers (though is probably too much for that helical focuser). Also, no special low profile adapters or anything needed for the cameras. Seen here is an ASI290MM with its standard 1.25" nose. Since we can control the focus ranges, we can probably get any camera to come to focus, even a dSLR (not doing that thought!).
- PSTNoBlackBox_Focus_Camera.jpg (94.78 KiB) Viewed 12046 times
So, the option where I just have the PST with no black box and potentially still double stack it, works. So that's good. I can at least do this and put a SM40II on it without the internal prism and janky focuser. The helical is plenty precise for this imaging train and course image scale.
The next thing is to diassemble and extend the collimating lens out for use in another scope as a PST Mod.
I will also test it in my SCT with its D-ERF just to show a Stage II PST mod on the SCT that is straight through.
Very best,
Last edited by MalVeauX on Tue Sep 10, 2019 1:04 am, edited 1 time in total.
-
MalVeauX
- Way More Fun to Share It!!
- Posts: 1861
- Joined: Tue May 09, 2017 7:58 pm
- Location: Florida
- Has thanked: 1188 times
- Been thanked: 1382 times
Re: PST, how to replace that black box?
Questions:
Are there any special coatings or ERF properties to the blue newer PST objective lenses?
Does a PST etalon need a particular ERF at all at 40mm aperture other than maybe a UV/IR block filter?
Very best,
Are there any special coatings or ERF properties to the blue newer PST objective lenses?
Does a PST etalon need a particular ERF at all at 40mm aperture other than maybe a UV/IR block filter?
Very best,
-
Merlin66
- Librarian
- Posts: 3972
- Joined: Tue Dec 13, 2011 1:23 pm
- Location: Junortoun, Australia
- Has thanked: 174 times
- Been thanked: 619 times
- Contact:
Re: PST, how to replace that black box?
The blue PST objective is just AR coated - no ERF qualities.
No need to add and upfront ERF etc with the 40mm aperture, the ITF at the rear is all that's required.
No need to add and upfront ERF etc with the 40mm aperture, the ITF at the rear is all that's required.
"Astronomical Spectroscopy - The Final Frontier" - to boldly go where few amateurs have gone before
https://groups.io/g/astronomicalspectroscopy
http://astronomicalspectroscopy.com
"Astronomical Spectroscopy for Amateurs" and
"Imaging Sunlight - using a digital spectroheliograph" - Springer
https://groups.io/g/astronomicalspectroscopy
http://astronomicalspectroscopy.com
"Astronomical Spectroscopy for Amateurs" and
"Imaging Sunlight - using a digital spectroheliograph" - Springer
-
bart1805
- Almost There...
- Posts: 636
- Joined: Mon Feb 06, 2017 9:04 pm
- Location: The Netherlands
- Been thanked: 1 time
Re: PST, how to replace that black box?
A set-up like this is quite ideal to check if the primary of for example your C8 is focussed the way it should with a PST mod. Just connect the train (the etalon and everything after that) and focus with the primary.
-
MalVeauX
- Way More Fun to Share It!!
- Posts: 1861
- Joined: Tue May 09, 2017 7:58 pm
- Location: Florida
- Has thanked: 1188 times
- Been thanked: 1382 times
Re: PST, how to replace that black box?
Thanks all,
Interesting, I will try it out and report.
So the ITF is effectively the ERF in a system with small aperture that doesn't need an ERF (say 40mm aperture).
So I could also plug this directly into my ST80 stopped down to 40mm with no ERF with some extensions in front and eliminate the gold tube and objective? And then it would be a HA module that just slides in for full disc...
I wonder what the max aperture would be that the ITF can then handle?
And in a system with an ERF, the ITF is not needed, right?
Very best,
-
MalVeauX
- Way More Fun to Share It!!
- Posts: 1861
- Joined: Tue May 09, 2017 7:58 pm
- Location: Florida
- Has thanked: 1188 times
- Been thanked: 1382 times
Re: PST, how to replace that black box?
Heya,
Got some testing in this morning.
I tested imaging straight through with the stock PST element and golden tube, and the replaced black box with the straight through design using the stock ITF and 5mm blocking filter. I used an ASI290MM camera so I had to do a 2 panel mosaic for the full disc. I was able to generate a flat field using a cereal bag over the front element. I didn't want to use IMX178 or similar sensors due to the weird grid patterns they produce in HA and the sensor is bigger than the blocking filter's diameter so I didn't want to fool with that again. Transmission was decent at 0.6ms 0 gain.
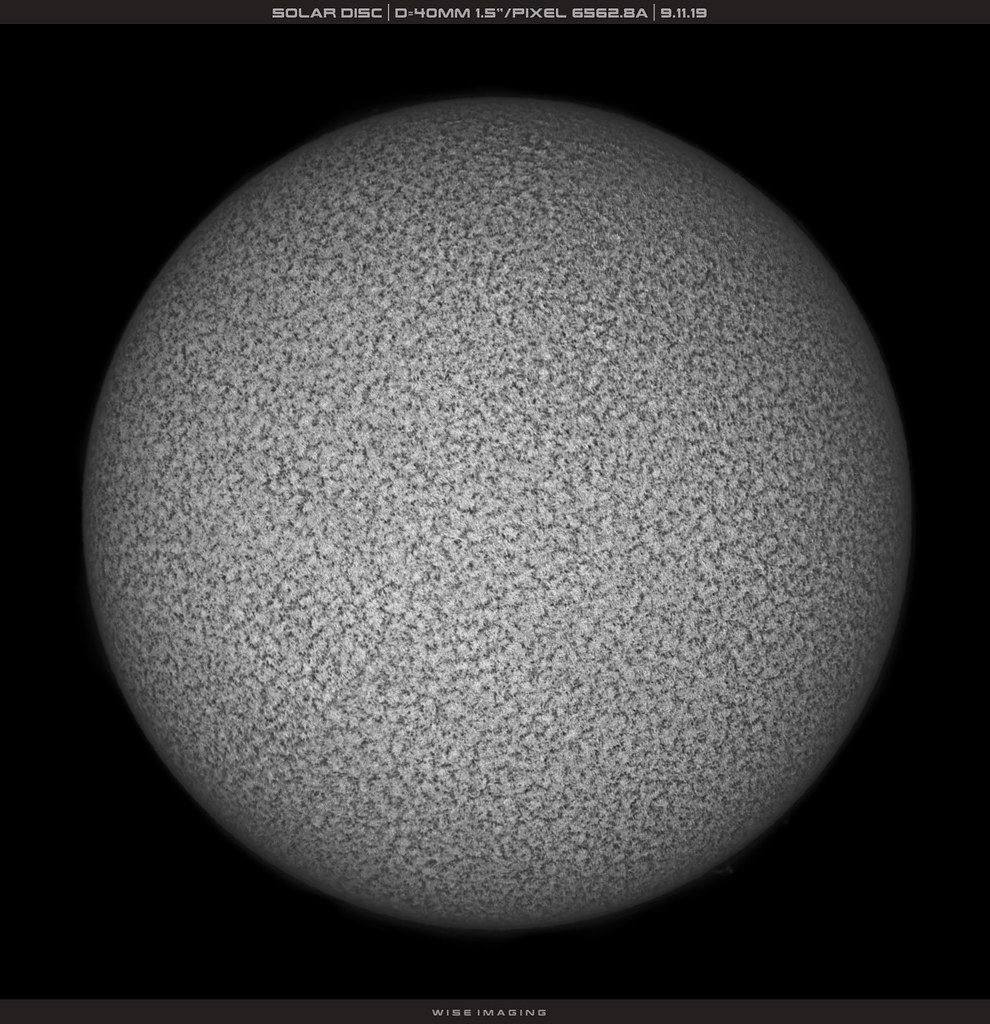
The next project is to extend the front collimating lens forward and use it in a refractor without cutting the OTA. I will test on my ST80 stopped down to 40mm first, as no ERF is needed there, just the ITF. But after I get a Baader Red CCD imaging filter, it will serve as the ERF and I will see about testing it on larger aperture refractors (I have up to 150mm).
To finish out this morning's tests, I also wanted to revisit the PST mod with the C8 SCT and Aires D-ERF. As Bart pointed out, it would be at the F10 focus point of an SCT in this configuration so I tried it out. I removed my crayford focuser and just used a 2" visual back. Inserted the AOK swiss adapters on both sides of the etalon and put it into the visual back. 8" back from there to my helical focuser and ASI290MM camera. Focused the primary mirror to focus. Used the helical inline to my camera to fine focus. Worked great. It has vignetting, but nothing a flat frame couldn't deal with, so I flat calibrated it and went from there. I left the ITF filter in line, but it's not needed, as I have a full aperture Aires D-ERF on front of this C8 Edge. So more testing to do there. Transmission was pretty decent (2.5ms with 0 gain).

Still more tests to do.
I think I need a larger blocking filter ideally for the C8 and the ASI290MM as I had to crop edges significantly as it was odd there.
Very best,
Got some testing in this morning.
I tested imaging straight through with the stock PST element and golden tube, and the replaced black box with the straight through design using the stock ITF and 5mm blocking filter. I used an ASI290MM camera so I had to do a 2 panel mosaic for the full disc. I was able to generate a flat field using a cereal bag over the front element. I didn't want to use IMX178 or similar sensors due to the weird grid patterns they produce in HA and the sensor is bigger than the blocking filter's diameter so I didn't want to fool with that again. Transmission was decent at 0.6ms 0 gain.
- PST_StraightThrough_09112019.jpg (68.37 KiB) Viewed 12014 times
- PST_FlatFrameCalibration_CerealBag.jpg (49.74 KiB) Viewed 12014 times
- PST_StraightThrough_ITF_5mmBF_Transmission_SingleStack_ASI290MM_09112019.jpg (75.75 KiB) Viewed 12014 times
The next project is to extend the front collimating lens forward and use it in a refractor without cutting the OTA. I will test on my ST80 stopped down to 40mm first, as no ERF is needed there, just the ITF. But after I get a Baader Red CCD imaging filter, it will serve as the ERF and I will see about testing it on larger aperture refractors (I have up to 150mm).
To finish out this morning's tests, I also wanted to revisit the PST mod with the C8 SCT and Aires D-ERF. As Bart pointed out, it would be at the F10 focus point of an SCT in this configuration so I tried it out. I removed my crayford focuser and just used a 2" visual back. Inserted the AOK swiss adapters on both sides of the etalon and put it into the visual back. 8" back from there to my helical focuser and ASI290MM camera. Focused the primary mirror to focus. Used the helical inline to my camera to fine focus. Worked great. It has vignetting, but nothing a flat frame couldn't deal with, so I flat calibrated it and went from there. I left the ITF filter in line, but it's not needed, as I have a full aperture Aires D-ERF on front of this C8 Edge. So more testing to do there. Transmission was pretty decent (2.5ms with 0 gain).
- C8_PSTMod_09112019.jpg (55.18 KiB) Viewed 12014 times
- C8_PSTMod2_09112019.jpg (86.11 KiB) Viewed 12014 times
- C8_PSTMod3_09112019.jpg (53.45 KiB) Viewed 12014 times
- PST_StraightThrough_5mmBF_C8Edge_DERF_ASI290MM_Transmission_09112019.jpg (79.96 KiB) Viewed 12014 times
Still more tests to do.
I think I need a larger blocking filter ideally for the C8 and the ASI290MM as I had to crop edges significantly as it was odd there.
Very best,
-
MalVeauX
- Way More Fun to Share It!!
- Posts: 1861
- Joined: Tue May 09, 2017 7:58 pm
- Location: Florida
- Has thanked: 1188 times
- Been thanked: 1382 times
Re: PST, how to replace that black box?
I did some more testing visually to make sure the scope was still useful. Straight through is perfect for imaging. For visual though, its still ideal to have a diagonal and a hat/cover. So I wanted to figure in a diagonal when needed.
I found that if I remove the 50mm 2" extension and insert a 1.25" star diagonal, I still can reach focus with the helical focuser and was using a 15mm 66* 1.25" eyepiece. Nice sharp view. So this works great for visual too, as if the black box was still doing its job, but minus that awful prism configuration.
So, the order is: PST objective & gold tube -> PST etalon -> AOK Swiss rear PST adapter -> M36 to 2" adapter (for the helical focuser) -> M36 1.25" helical focuser -> 1.25" nose with ITF threaded into it -> M28 to M33 adapter -> PST eyepiece cup with 5mm blocking filter -> eyepiece
So, 50mm extension inline and it's in imaging mode for both full disc and inserted into larger OTAs.
Without the 50mm extension inline, its in visual mode for standard use. And it will be ready for a SM40II double stack module.
And it's binoviewer friendly (though I don't trust that helical with a big set of heavy binos).
Very best,
I found that if I remove the 50mm 2" extension and insert a 1.25" star diagonal, I still can reach focus with the helical focuser and was using a 15mm 66* 1.25" eyepiece. Nice sharp view. So this works great for visual too, as if the black box was still doing its job, but minus that awful prism configuration.
So, the order is: PST objective & gold tube -> PST etalon -> AOK Swiss rear PST adapter -> M36 to 2" adapter (for the helical focuser) -> M36 1.25" helical focuser -> 1.25" nose with ITF threaded into it -> M28 to M33 adapter -> PST eyepiece cup with 5mm blocking filter -> eyepiece
So, 50mm extension inline and it's in imaging mode for both full disc and inserted into larger OTAs.
Without the 50mm extension inline, its in visual mode for standard use. And it will be ready for a SM40II double stack module.
And it's binoviewer friendly (though I don't trust that helical with a big set of heavy binos).
- PST_diagonal_visual_09112019.jpg (68.58 KiB) Viewed 12010 times
Re: PST, how to replace that black box?
Hey Marty,
That's a good looking mod, robust and quite versatile. Images turned out well as proof.
Either I missed something or I just don't understand. How did you attach the ITF to the 1.25 nose and was the m28 to m33 a custom adapter?
Phil
That's a good looking mod, robust and quite versatile. Images turned out well as proof.
Either I missed something or I just don't understand. How did you attach the ITF to the 1.25 nose and was the m28 to m33 a custom adapter?
Phil
-
marktownley
- Librarian
- Posts: 42545
- Joined: Tue Oct 18, 2011 5:27 pm
- Location: Brierley Hills, UK
- Has thanked: 20813 times
- Been thanked: 10485 times
- Contact:
Re: PST, how to replace that black box?
You've done a great job there Marty, nice engineering solution.
http://brierleyhillsolar.blogspot.co.uk/
Solar images, a collection of all the most up to date live solar data on the web, imaging & processing tutorials - please take a look!
-
MalVeauX
- Way More Fun to Share It!!
- Posts: 1861
- Joined: Tue May 09, 2017 7:58 pm
- Location: Florida
- Has thanked: 1188 times
- Been thanked: 1382 times
Re: PST, how to replace that black box?
Hey Phil,
The ITF threads into an eyepiece nose (1.25"), which is M28 I think? It has a little trouble initially threading, but if you file down the initial few threads it goes right in smooth after that. I have it separate from the eyecup holder. The cyccup holder has the blocking filter and is M33. So I use a M33 to M28 adapter to step it down to typical 1.25" stuff. I'll get some pictures of it all this weekend.
++++++++++++++++++++
Here's the ITF threaded into a 1.25" nose:
- PST_adpated_BF_ITF.jpg (116.33 KiB) Viewed 11934 times
Last edited by MalVeauX on Sat Sep 14, 2019 2:51 pm, edited 1 time in total.
-
Merlin66
- Librarian
- Posts: 3972
- Joined: Tue Dec 13, 2011 1:23 pm
- Location: Junortoun, Australia
- Has thanked: 174 times
- Been thanked: 619 times
- Contact:
Re: PST, how to replace that black box?
Marty,
As you're still using the PST 5mm blocking/sort filter why change the ITF? I would have thought the original built in ITF would have done the job??
As you're still using the PST 5mm blocking/sort filter why change the ITF? I would have thought the original built in ITF would have done the job??
"Astronomical Spectroscopy - The Final Frontier" - to boldly go where few amateurs have gone before
https://groups.io/g/astronomicalspectroscopy
http://astronomicalspectroscopy.com
"Astronomical Spectroscopy for Amateurs" and
"Imaging Sunlight - using a digital spectroheliograph" - Springer
https://groups.io/g/astronomicalspectroscopy
http://astronomicalspectroscopy.com
"Astronomical Spectroscopy for Amateurs" and
"Imaging Sunlight - using a digital spectroheliograph" - Springer
-
MalVeauX
- Way More Fun to Share It!!
- Posts: 1861
- Joined: Tue May 09, 2017 7:58 pm
- Location: Florida
- Has thanked: 1188 times
- Been thanked: 1382 times
Re: PST, how to replace that black box?
The original one I had, the ITF was part of the element (red lens) and the eyecup didn't have an ITF in it. The new one has a blue element and an ITF filter was added in that chamber. I have the two scopes and harvested parts, as the etalon that came with the newer PST has a decontacted etalon (at least I think?). My understanding was that the ITF was needed before the blocking filter with the blue element PST lens. But if that's not needed at all, I'll happily remove it.
+++++++++++++
+++++++++++++
On another note, speaking of PST mods. I'm wondering, if I take this into a 60mm F10 scope, I can get a solarmax 60mm ii module and use an adapter to thread it the new scope (like my ED80 stopped down to 60mm, producing F10) and it would effectively be a good 60mm double stack right? In this situation, does the front etalon have an ERF that would allow me to then also remove the ITF filter all together?
Are there any situations i can remove the ITF filter in a single stack use without a front mounted ERF?
Very best,
-
Merlin66
- Librarian
- Posts: 3972
- Joined: Tue Dec 13, 2011 1:23 pm
- Location: Junortoun, Australia
- Has thanked: 174 times
- Been thanked: 619 times
- Contact:
Re: PST, how to replace that black box?
Marty,
Belt and braces....gives some added safety.
You can never be sure of the capabilities of the ERF - some are better than others.
Don’t take the risk.
Belt and braces....gives some added safety.
You can never be sure of the capabilities of the ERF - some are better than others.
Don’t take the risk.
"Astronomical Spectroscopy - The Final Frontier" - to boldly go where few amateurs have gone before
https://groups.io/g/astronomicalspectroscopy
http://astronomicalspectroscopy.com
"Astronomical Spectroscopy for Amateurs" and
"Imaging Sunlight - using a digital spectroheliograph" - Springer
https://groups.io/g/astronomicalspectroscopy
http://astronomicalspectroscopy.com
"Astronomical Spectroscopy for Amateurs" and
"Imaging Sunlight - using a digital spectroheliograph" - Springer
-
MalVeauX
- Way More Fun to Share It!!
- Posts: 1861
- Joined: Tue May 09, 2017 7:58 pm
- Location: Florida
- Has thanked: 1188 times
- Been thanked: 1382 times
Re: PST, how to replace that black box?
Strictly for imaging purposes for context, would you still use the ITF with a Solarmax 60 II module stacked in front of a PST etalon in a 60mm F10 scope with a blocking filter?
Also, what do you think of doing a SM 60 II etalon on an ED80 with a PST etalon mod inserted into its focuser? Worth while? I've never seen these types of etalons mixed or talked about so not sure if it's something that wouldn't work well or not matched well. I figured, the SM 40 II mixes with a PST etalon, so if I scale the PST etalon up to 60mm F10 with a scope and then put a SM 60 II etalon on the front of it, it's a double stack 60mm at F10 and should be ok, but I'm not sure.
Very best,
-
Merlin66
- Librarian
- Posts: 3972
- Joined: Tue Dec 13, 2011 1:23 pm
- Location: Junortoun, Australia
- Has thanked: 174 times
- Been thanked: 619 times
- Contact:
Re: PST, how to replace that black box?
Marty,
I use a SM60 on an ED80 with a PST etalon as a double stack.
I also use a BF10 diagonal....so effectively an ERF up front and a second in the Coronado BF.
No issues, no drama.
Using the PST etalon and SM60 is not to much different from adding a front etalon to a SolarMax II.
I use a SM60 on an ED80 with a PST etalon as a double stack.
I also use a BF10 diagonal....so effectively an ERF up front and a second in the Coronado BF.
No issues, no drama.
Using the PST etalon and SM60 is not to much different from adding a front etalon to a SolarMax II.
"Astronomical Spectroscopy - The Final Frontier" - to boldly go where few amateurs have gone before
https://groups.io/g/astronomicalspectroscopy
http://astronomicalspectroscopy.com
"Astronomical Spectroscopy for Amateurs" and
"Imaging Sunlight - using a digital spectroheliograph" - Springer
https://groups.io/g/astronomicalspectroscopy
http://astronomicalspectroscopy.com
"Astronomical Spectroscopy for Amateurs" and
"Imaging Sunlight - using a digital spectroheliograph" - Springer
-
MalVeauX
- Way More Fun to Share It!!
- Posts: 1861
- Joined: Tue May 09, 2017 7:58 pm
- Location: Florida
- Has thanked: 1188 times
- Been thanked: 1382 times
Re: PST, how to replace that black box?
Excellent to know, I think I will go this direction, rather than a SM40II so that I can have better resolution and the scope can be used to do more wavelengths, being a versatile modular system. Thanks!Merlin66 wrote: ↑Sat Sep 14, 2019 4:39 am Marty,
I use a SM60 on an ED80 with a PST etalon as a double stack.
I also use a BF10 diagonal....so effectively an ERF up front and a second in the Coronado BF.
No issues, no drama.
Using the PST etalon and SM60 is not to much different from adding a front etalon to a SolarMax II.
Very best,
-
MalVeauX
- Way More Fun to Share It!!
- Posts: 1861
- Joined: Tue May 09, 2017 7:58 pm
- Location: Florida
- Has thanked: 1188 times
- Been thanked: 1382 times
Re: PST, how to replace that black box?
I sent you an email regarding this configuration.Merlin66 wrote: ↑Sat Sep 14, 2019 4:39 am Marty,
I use a SM60 on an ED80 with a PST etalon as a double stack.
I also use a BF10 diagonal....so effectively an ERF up front and a second in the Coronado BF.
No issues, no drama.
Using the PST etalon and SM60 is not to much different from adding a front etalon to a SolarMax II.
Very best,
Re: PST, how to replace that black box?
Thanks Marty,
I will give it a try if I can souce an adapter (m33 to m28.5). Do you remember where you got yours?
Phil
I will give it a try if I can souce an adapter (m33 to m28.5). Do you remember where you got yours?
Phil
-
MalVeauX
- Way More Fun to Share It!!
- Posts: 1861
- Joined: Tue May 09, 2017 7:58 pm
- Location: Florida
- Has thanked: 1188 times
- Been thanked: 1382 times
Re: PST, how to replace that black box?
Hey Phil,
https://www.ebay.com/itm/143365782389
That's the one I got.
With a little work, it threaded into a typical 1.25" eyepiece nose. It lets me step down the eyecup and blocking filter, regardless of the ITF, to work in standard equipment.
That M33 is the same threading found in typical cheap 1.25" star diagonals. So if you didn't want to even bother with this adapter, just get a cheap old celestron 1.25" star diagonal and the eyecup stalk with the ITF & blocking filter, straight off the black box of a PST, will thread right to the diagonal and you can just use it like that too. Still eliminates the black box. I just went the extra step to remove all extra glass for imaging purposes. For visual, I insert the diagonal again as seen above.
And if anyone cares, here's the cheap 2" to M36 adapter that comes with a helical focuser (same thing found on any typical guidescope package by the way, its decent for light loads):
https://www.amazon.com/gp/product/B07HR ... UTF8&psc=1
+++++++++++++++++++++
+++++++++++++++++++++
So far, the brightness/transmission is higher, significantly so, than when it was stock. That internal prism was doing something. I'm not sure if each surface robbed transmission or what. I think it's a pentaprism if I recall. But maybe each surface soaks up a little transmission. Either way, before, I was at 10ms. Now I'm at 0.6ms with a straight through configuration and the same blocking filter, same ITF, etc. Visually its nice and bright. I just used it and could see plainly proms nicely that were feint when I compared to what's on GONG.
Very best,
Re: PST, how to replace that black box?
Thanks again Marty. Adapter ordered, should be here next month. Good luck with your mod.
Phil
Phil
-
MalVeauX
- Way More Fun to Share It!!
- Posts: 1861
- Joined: Tue May 09, 2017 7:58 pm
- Location: Florida
- Has thanked: 1188 times
- Been thanked: 1382 times
Re: PST, how to replace that black box?
Lovely little visual setup without the black box, so much sharper than before.
Very best,
- PST_NoBlackBox_Visual_09152019.jpg (90.11 KiB) Viewed 11894 times
-
MalVeauX
- Way More Fun to Share It!!
- Posts: 1861
- Joined: Tue May 09, 2017 7:58 pm
- Location: Florida
- Has thanked: 1188 times
- Been thanked: 1382 times
Re: PST, how to replace that black box?
Update:
I got all my bits and bobs together and was able to do some proper testing today.
I measured my ED80 and C6R's focus points so that I could see the overall distances to get to the magical -200mm in focus for the PST collimating lens. Turns out, with my focusers, all I needed was 1.25" roughly into the tube, and no space into the tube on my C6R (it was previously chopped for binoviewer use). So I only needed the AOK swiss adapter for the distance, and brought the collimating lens out to the tip, which kept me from having to chop 60mm or so off my OTA of the ED80 which is unmodified. The PST module I built came to focus nicely. Worked great. I stopped the ED80 down to 52mm with its internal stock cap making it around F11 or near that. Once I get a SM60 module on there it will be F10 exactly. But the test worked. I then tested with the C6R and it came to focus nicely, the resolution and detail was great! Visually both were very satisfying with good contrast. I could make out surface spicules and the limb proms no problem, was quite nice and bright. I didn't need a big expensive D-ERF either. I used an internal 50mm Baader IR CCD-R red imaging filter as an ERF and it worked great. I can insert this module into my ED80 for full disc, C6R (stopped down to 120mm F10) for high res visual and imaging, or my C8 Edge for high res imaging no problem without having to change much. Quite nice! No chopping of my OTAs. Works in all the instruments.
My next step is to get a 10mm blocking filter, got one on the way, found it used.
After that, if things look good, I will get an adapter from PreciseParts and a SM60II DS etalon to allow for full disc DS visual and imaging on the ED80.
Then... I'm done with HA and it's on to Cak...
Here's the module, completed as of now.

I extended the front collimating lens out away from the PST etalon with the AOK Swiss front PST adapter. It was about 1.25 ish inches, so it was just right. I threaded the stock PST collimating lens and its internal holding disc into the M48 threads. I used a gender reversal adapter to then give it female threads. I then used a 2" spacer that is about 0.5" to give it more room and with female threads which allowed me to then thread the Baader 2" Red CCD-IR imaging filter on there, which acts as the primary D-ERF. This D-ERF internally can handle a 150mm aperture refractor no problem, as I've done this in the past with HA and CaK with this very C6R. No need for larger D-ERF nor up front with this module in 6" or less instruments (refractors only at this point).
Currently the ITF and stock 5mm blocking filter are still in line in the rear with the AOK swiss rear adapter followed by a 2" to M36 helical focuser and a M33 to M28 adapter to step down the PST eyecup with its stock BF and all that to use. Straight through. No prism. No black box. Currently this module is a stand alone that can be inserted into any of my OTAs and used vsually or for imaging without having to change much and I don't have to chop up an OTA to get it to work. Universal and modular.
Test 1
The first test was to remove the PST golden tube and 40mm objective and replace it wth another OTA. In this case, the venerable ED80, and in doing so, without having to cut the OTA. This is an ED80 with a GSO dual speed focuser. To get it to F10 (or longer) I just used the stock lens shade internal cap which is about 52mm in aperture so its around F11ish give or take. Good enough. I measured the focus point and it was about 1.25" into the focuser. The module is already set for this. Inserted it. Helical focuser allowed fine focus. It achieved focus no problem for visual and imaging. Visually it was great, good contrast, bright, full disc image with a 15mm eyepiece. Imaging, with the ASi290MM, I had to do a mosaic to do full disc, but was still good for this initial test. Can't wait to double stack it.


Here's a full disc mosaic made with the above ED80 + PST modular setup with an ASI290MM under poor seeing with the stock 5mm blocking filter:

Test 2
The next test was then to insert this modular PST kit into a C6R, 150mm F8 achromatic refractor with its stock lens shade internal cap removed which stops the scope down to 120mm F10 which makes it perfect for PST mod use. It again came to focus no problem, and provided a wonderful visual view and was great for imaging. This OTA was cut previously for binoviewer use, but if I had to extend it, it would have been fine as I have extensions.


Here's a limb shot with the 120mm F10 (C6R stopped down) and the PST module kit above. The internal 50mm D-ERF (baader red imaging CCD-IR filter) worked great and handled all the heat with the module. No costly front mounted D-ERF needed here.

This scope will double as my CaK scope when I get my next filter ready for 393.4nm with 6" capability on the aperture. I will primarily use this when seeing is poor and there are good proms.
++++++++++++++++++++++++
Next up with be an adapter and SM60II DS etalon to add to my ED80 for visual & imaging in HA.
Then, I will explore a CaK lunt module (1200 probably) to go from there.
Very best,
I got all my bits and bobs together and was able to do some proper testing today.
I measured my ED80 and C6R's focus points so that I could see the overall distances to get to the magical -200mm in focus for the PST collimating lens. Turns out, with my focusers, all I needed was 1.25" roughly into the tube, and no space into the tube on my C6R (it was previously chopped for binoviewer use). So I only needed the AOK swiss adapter for the distance, and brought the collimating lens out to the tip, which kept me from having to chop 60mm or so off my OTA of the ED80 which is unmodified. The PST module I built came to focus nicely. Worked great. I stopped the ED80 down to 52mm with its internal stock cap making it around F11 or near that. Once I get a SM60 module on there it will be F10 exactly. But the test worked. I then tested with the C6R and it came to focus nicely, the resolution and detail was great! Visually both were very satisfying with good contrast. I could make out surface spicules and the limb proms no problem, was quite nice and bright. I didn't need a big expensive D-ERF either. I used an internal 50mm Baader IR CCD-R red imaging filter as an ERF and it worked great. I can insert this module into my ED80 for full disc, C6R (stopped down to 120mm F10) for high res visual and imaging, or my C8 Edge for high res imaging no problem without having to change much. Quite nice! No chopping of my OTAs. Works in all the instruments.
My next step is to get a 10mm blocking filter, got one on the way, found it used.
After that, if things look good, I will get an adapter from PreciseParts and a SM60II DS etalon to allow for full disc DS visual and imaging on the ED80.
Then... I'm done with HA and it's on to Cak...
Here's the module, completed as of now.
I extended the front collimating lens out away from the PST etalon with the AOK Swiss front PST adapter. It was about 1.25 ish inches, so it was just right. I threaded the stock PST collimating lens and its internal holding disc into the M48 threads. I used a gender reversal adapter to then give it female threads. I then used a 2" spacer that is about 0.5" to give it more room and with female threads which allowed me to then thread the Baader 2" Red CCD-IR imaging filter on there, which acts as the primary D-ERF. This D-ERF internally can handle a 150mm aperture refractor no problem, as I've done this in the past with HA and CaK with this very C6R. No need for larger D-ERF nor up front with this module in 6" or less instruments (refractors only at this point).
Currently the ITF and stock 5mm blocking filter are still in line in the rear with the AOK swiss rear adapter followed by a 2" to M36 helical focuser and a M33 to M28 adapter to step down the PST eyecup with its stock BF and all that to use. Straight through. No prism. No black box. Currently this module is a stand alone that can be inserted into any of my OTAs and used vsually or for imaging without having to change much and I don't have to chop up an OTA to get it to work. Universal and modular.
Test 1
The first test was to remove the PST golden tube and 40mm objective and replace it wth another OTA. In this case, the venerable ED80, and in doing so, without having to cut the OTA. This is an ED80 with a GSO dual speed focuser. To get it to F10 (or longer) I just used the stock lens shade internal cap which is about 52mm in aperture so its around F11ish give or take. Good enough. I measured the focus point and it was about 1.25" into the focuser. The module is already set for this. Inserted it. Helical focuser allowed fine focus. It achieved focus no problem for visual and imaging. Visually it was great, good contrast, bright, full disc image with a 15mm eyepiece. Imaging, with the ASi290MM, I had to do a mosaic to do full disc, but was still good for this initial test. Can't wait to double stack it.
Here's a full disc mosaic made with the above ED80 + PST modular setup with an ASI290MM under poor seeing with the stock 5mm blocking filter:
Test 2
The next test was then to insert this modular PST kit into a C6R, 150mm F8 achromatic refractor with its stock lens shade internal cap removed which stops the scope down to 120mm F10 which makes it perfect for PST mod use. It again came to focus no problem, and provided a wonderful visual view and was great for imaging. This OTA was cut previously for binoviewer use, but if I had to extend it, it would have been fine as I have extensions.
Here's a limb shot with the 120mm F10 (C6R stopped down) and the PST module kit above. The internal 50mm D-ERF (baader red imaging CCD-IR filter) worked great and handled all the heat with the module. No costly front mounted D-ERF needed here.
This scope will double as my CaK scope when I get my next filter ready for 393.4nm with 6" capability on the aperture. I will primarily use this when seeing is poor and there are good proms.
++++++++++++++++++++++++
Next up with be an adapter and SM60II DS etalon to add to my ED80 for visual & imaging in HA.
Then, I will explore a CaK lunt module (1200 probably) to go from there.
Very best,
-
MalVeauX
- Way More Fun to Share It!!
- Posts: 1861
- Joined: Tue May 09, 2017 7:58 pm
- Location: Florida
- Has thanked: 1188 times
- Been thanked: 1382 times
Re: Easy PST Module with ERF (non-destructive, no cutting of OTA, & no-black-box rebuild)
Another update:
I picked up a Coronado (pre-Meade, old one) 10mm blocking filter for a good price. The filter is good and the ITF looks fine. Transmission is lower than my stock PST one, but only by a little bit, still able to image sub 10ms and with zero gain both for full disc and at high resolution, so it's a keeper. Checked it out visually first, it was great. Then went to testing it for imaging. Was hoping it would help with full discs with a larger sensor and it did. And hoped it would help a little bit with the larger apertures, but there's still some work to be done there to get all the tilt and issues out. Still working on that. Hopefully will be able to source a SM60II module next.
ED80 with the PST module & 10mm BF and IMX174 sensor (full disc FOV)

120mm F10 achromat with PST module with 10m BF and 290MM sensor

C8 Edge + Aires D-ERF + PST module with 10mm BF and 290MM sensor

Very best,
I picked up a Coronado (pre-Meade, old one) 10mm blocking filter for a good price. The filter is good and the ITF looks fine. Transmission is lower than my stock PST one, but only by a little bit, still able to image sub 10ms and with zero gain both for full disc and at high resolution, so it's a keeper. Checked it out visually first, it was great. Then went to testing it for imaging. Was hoping it would help with full discs with a larger sensor and it did. And hoped it would help a little bit with the larger apertures, but there's still some work to be done there to get all the tilt and issues out. Still working on that. Hopefully will be able to source a SM60II module next.
- ED80_PSTMod_10mmBF_09232019.jpg (66.78 KiB) Viewed 11780 times
- PSTModule_10mmBF_120F10_09232019.jpg (60.38 KiB) Viewed 11780 times
120mm F10 achromat with PST module with 10m BF and 290MM sensor
C8 Edge + Aires D-ERF + PST module with 10mm BF and 290MM sensor
Very best,
-
MAURITS

- Way More Fun to Share It!!
- Posts: 8615
- Joined: Tue Nov 27, 2018 4:37 pm
- Location: Belgium
- Has thanked: 2464 times
- Been thanked: 4880 times
- Contact:
Re: Easy PST Module with ERF (non-destructive, no cutting of OTA, & no-black-box rebuild)
What a great review Marty.
In the first place you need for sure the knowledge to make such a pst etalon, looks on the first sight difficult.
The results are awesome.
In the first place you need for sure the knowledge to make such a pst etalon, looks on the first sight difficult.
The results are awesome.